
Manage blue time for low-light photography
When you practice photography, it is important to know how to manage low-light conditions. These situations can be a challenge. But with the right techniques, you can capture amazing images even in low-light conditions. One of the most interesting periods for photographing in low light is what is called blue hour.
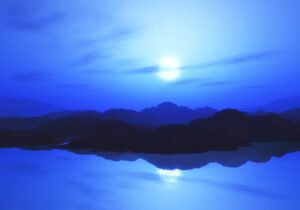
What is blue hour ?
The blue hour is a short period of time just before sunrise or after sunset. During this period, the sky takes on a spectacular bluish hue that creates a unique and magical atmosphere. This is the ideal time to capture photos with soft light and a calm atmosphere.
Preparation before the photo shoot
To make your photos in low light during the blue hour, it is essential to prepare well. Here are some tips:
- Choose an interesting place. Find a place that offers a good point of view or an interesting subject for your photos.
- Use a tripod. In low light, you will need a slower shutter speed, so it is recommended to use a tripod to avoid motion blur.
- Bring appropriate objectives. Large aperture lenses such as fixed focal length lenses or light zooms are ideal for capturing the available light.
- Plan your equipment. Make sure you have enough batteries and memory cards so you don’t run out of space or power during your session.
Camera settings
Once there, it is important to properly adjust your camera to get the best results. Here are some parameters to take into account:
- ISO: Set your ISO to a higher value to compensate for the lack of light. However, be careful not to increase the ISO too much to avoid excessive noise in your photos.
- Aperture: Use a wider aperture to allow more light to enter the camera. This can also create an artistic blur effect.
- Shutter speed: Since the light is low, you will have to use a slower shutter speed to capture enough light. Use a tripod to avoid motion blurs.
- White balance: Set your white balance to automatic or to the appropriate mode to get realistic colors.
Experiment with the composition
Blue time offers a unique opportunity to play with the composition of your photos. Here are some ideas to inspire you:
- Silhouettes: Use the soft light of the blue hour to create dramatic silhouettes.
- Reflections: Look for reflective surfaces to capture the reflections of blue light.
- Architecture: Buildings illuminated by blue light can create a mysterious atmosphere.
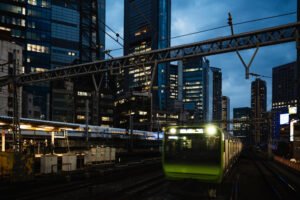
- Urban landscapes: Capture the city’s lights during blue hour for magical urban photos.
Post-processing
After your photo session, you can further improve your images by using photo editing software such as Lightroom or Photoshop. You can adjust the brightness, contrast and color balance to achieve the desired result.
Low-light photography can be a challenge. But with a little practice and the right techniques, you can capture incredible images during the blue hour. So, take out your camera and explore the possibilities of low-light photography.
Light trails in low-light photography
Low-light photography is a fascinating field that allows you to capture nocturnal scenes and unique light effects. One of the most popular effects in low light is the capture of light trails, which add a touch of magic and dynamism to your photos.
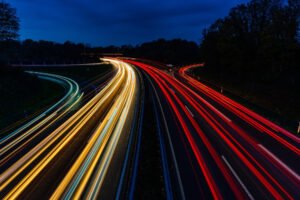
What are light trails ?
Light trails are lines or curves of light that appear in a photo when moving objects are captured during prolonged exposure. This occurs when you use a slow shutter speed, allowing light to accumulate on the camera sensor for a longer period of time.
How to capture light trails ?
To capture light trails, you will need a camera with manual settings, such as a DSLR or a hybrid camera. Here are the steps to follow:
- Choose a place with moving light sources, such as cars, traffic lights or stars.
- Place your camera on a tripod to avoid any motion blur.
- Set your camera to manual mode and select a slow shutter speed, for example 10 seconds.
- Adjust the opening to get the right exposure. A smaller aperture (a higher number f/high) will reduce the amount of light entering the camera.
- Use low ISO sensitivity to avoid noise in the image.
- Press the shutter release and let the camera capture the light trails for the duration of the exposure.
Tips for successful light trails
Here are some tips to get great light trails in your photos:
- Experiment with different shutter speeds to obtain various effects. Slower speeds will give longer and smoother drags, while faster speeds will give shorter and sharper drags.
- Try different light sources and different angles to get unique results.
- Use a remote shutter release or the camera’s self-timer. This will avoid any unwanted movement when pressing the trigger.
- Take into account the composition of your photo by including other interesting elements, such as buildings or people, to add depth and visual interest.
Post-treatment of light trails
Once you have captured your light trails, you can further improve them with post-processing techniques. You can adjust the brightness, contrast and saturation to achieve the desired effect. You can also use retouching tools to remove unwanted elements from the photo.
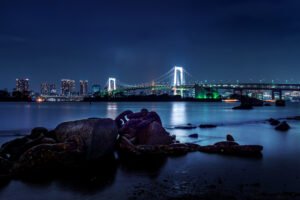
Artificial light in low-light photography
Low-light photography can be a challenge for many photographers. Whether it is to capture night scenes or to take photos indoors with limited artificial light, it is important to know the techniques and tricks to achieve great results.
1. Use a tripod
When photographing in low light, it is essential to use a tripod to avoid motion blurs. Artificial light may be weak and require longer exposure times, making it difficult to hold the camera by hand. A tripod will allow you to stabilize your device and obtain sharp images.
2. Increase ISO sensitivity
ISO sensitivity determines the ability of your camera to capture light. When shooting in low light, you will have to increase the ISO sensitivity to compensate for the lack of light. However, keep in mind that high ISO values can cause digital noise in your photos. Try to find a balance between high ISO sensitivity and acceptable image quality.
3. Use a wide aperture lens
A large aperture lens, also known as a low aperture lens, will allow you to capture more light. Lenses with a maximum aperture of f/1.8 or f/2.8 are ideal for low-light photography. They will allow you to obtain bright and well-exposed images, even in low-light conditions.
4. Experiment with lighting
Artificial light can offer many creative possibilities in low-light photography. Play with the available light sources to create interesting effects. Use lamps, candles or even street lighting to add dimension and atmosphere to your photos.
5. Use the priority mode at the opening
The aperture priority mode allows you to control the depth of field of your photos. When shooting in low light, it is often better to use a wider aperture to let in more light. Set your camera to this mode and adjust the aperture accordingly.
6. Use the noise reduction function
Many cameras are equipped with a noise reduction function that can be useful when photographing in low light. This function reduces digital noise in your photos, which can be more visible at high ISO sensitivities. Be sure to activate it in your camera settings to get sharper images.
7. Experiment with white balance
The white balance determines the color temperature of your photos. When you photograph in low light, artificial light can have a yellowish or bluish hue. Play with white balance settings to get the most accurate colors possible. You can also experiment with custom settings to get creative effects.
8. Take photos in RAW mode
The RAW format captures all the data in the image, which gives you more flexibility when editing. When shooting in low light, it is best to take photos in RAW mode to be able to adjust exposure, white balance and other parameters during post-production.
Low-light photography with artificial light can be a challenge, but with the right techniques and tricks, you can get impressive results. Use a tripod to avoid motion blurs. Increase ISO sensitivity to compensate for the lack of light, use a large aperture lens to capture more light and experiment with lighting to create interesting effects. Don’t forget to use the aperture priority mode, the noise reduction function, white balance and take photos in RAW mode to get the best possible results. Now, go out and capture beautiful photos in low light with artificial light!
Shoot in the moonlight in low-light photography
Low-light photography is a fascinating field that offers many creative possibilities. One of the most interesting techniques in this field is photography in the light of the moon. In this part, we will explore the different ways to capture incredible images using the light of the moon as the main source.
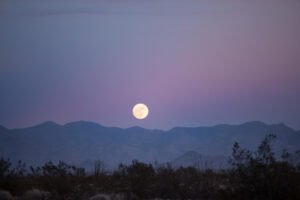
1. Understanding the light of the moon
The light of the moon is much weaker than sunlight. This means that you will have to adjust your parameters to get correct exposure. The key to a successful photograph in the moonlight is to find the right balance between ISO sensitivity, aperture and shutter speed.
ISO sensitivity determines the amount of light captured by your camera’s sensor. For low-light shots, you will have to increase the ISO sensitivity to compensate for the lack of light. However, keep in mind that too high ISO values can cause digital noise in your images. So try to find the right balance.
The aperture controls the amount of light that enters the lens of your camera. For shooting in moonlight, a wider aperture (a smaller number f/smaller) will allow more light to reach the sensor. This can also create an interesting bokeh effect around the moon.
The shutter speed determines how long your camera’s sensor is exposed to light. For shooting in the moonlight, you will have to use a slower shutter speed to allow enough light to reach the sensor. Use a tripod to avoid motion blurs.
2. Choose the right time in low-light photography
The light of the moon varies according to its phase and position in the sky. To get the best results, choose a time when the moon is high in the sky. And that it is bright enough to illuminate your subject. Full moon nights are ideal for photography in the moonlight. Do not hesitate to experiment with other phases of the moon to obtain different effects.
It is also important to check the weather forecast. Clouds can block the light of the moon, which will make it difficult to capture sharp and bright images. Choose a clear and cloud-free night to get the best results.
3. Use accessories
To optimize your shots in the moonlight, you can use some accessories. A tripod is essential to avoid motion blur when using a slow shutter speed. You can also use a remote control or a remote shutter release to avoid moving the camera when shooting.
An ND neutral density filter can also be useful to reduce the brightness of the moon and achieve a more balanced exposure with the rest of the scene. This can be particularly useful when photographing nocturnal landscapes with the moon in the frame.
4. Experiment with the settings
Photography in the light of the moon is an art form that allows you to experiment with different settings to obtain unique results. Do not hesitate to try different combinations of ISO sensitivity, aperture and shutter speed to find the style that suits you best.
You can also try different composition techniques. Such as using an interesting foreground to add depth to your images or using the moon as the main focal point.
5. Post-processing
Once you have captured your images in the moonlight, you can further improve them by using post-processing software such as Adobe Lightroom or Photoshop. You can adjust exposure, white balance and contrast levels to achieve the desired final result.
Photography in the light of the moon offers a unique opportunity to capture atmospheric and mysterious images. By understanding the basic principles of low-light exposure and experimenting with different settings, you can create unique and captivating photos. So the next time you see the moon shine in the sky, take out your camera and let your creativity run wild.
Work freehand in low-light photography
Low-light photography can be a challenge for many photographers. However, with the right techniques and equipment, it is possible to capture quality images even in low light conditions. In this part, we will focus on low-light photography using the freehand work technique.
1. Use a quick lens
When working in low light, it is essential to use a fast lens that captures more light. Choose a lens with a large opening. A f/1.8 or f/2.8, which will allow you to maintain a higher shutter speed.
2. Increase ISO sensitivity
To compensate for the lack of light, you can increase the ISO sensitivity of your camera. This will allow your sensor to capture more light, but keep in mind that it can also introduce noise into your images. Try to find the right balance between ISO sensitivity and image quality.
3. Use image stabilization
Image stabilization is a feature present on many cameras. It makes it possible to compensate for the movements of the hand. This can be particularly useful when working freehand in low light, because it will allow you to maintain a sharp image even with a slower shutter speed.
4. Experiment with shooting modes
Most digital cameras offer different shooting modes, such as aperture priority mode or speed priority mode. Experiment with these modes to find the one that best suits your style of low-light photography.
5. Use the ambient light
When working freehand in low light, try to use the available ambient light to illuminate your subject. Look for natural or artificial light sources that can add interest and depth to your images.
6. Use a tripod
If you need a slower shutter speed to capture more light, use a tripod to stabilize your camera. This will allow you to reduce motion blur and get sharper images.
7. Experiment with the camera settings
Do not hesitate to experiment with your camera’s settings in low light. Use manual mode and try different combinations of shutter speed, aperture and ISO sensitivity to get the best results. Take the time to understand how your device reacts to light in low-light conditions.
Conclusion
In conclusion, photographing in low light can be a challenge, but it can also give incredible results. By using the tips mentioned above, you will be able to capture unique and creative images even in low light conditions. Don’t be afraid to experiment and give free rein to your creativity. Have a good photo shoot!


